I’ve been playing a lot with the Azure Custom Vision Service - a great service to build image classification and object detection models with just a few images. To make it easier to test my models, I wanted to build a mobile app that connects to a custom vision project and uses that to classify or detect objects in images captured using the camera.
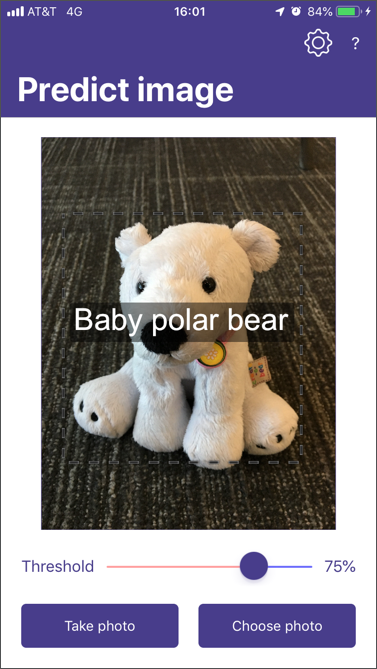
The app is pretty simple, it’s a Xamarin app that uses a camera plugin and the Custom Vision SDKs. There is a problem with it… Configuration.
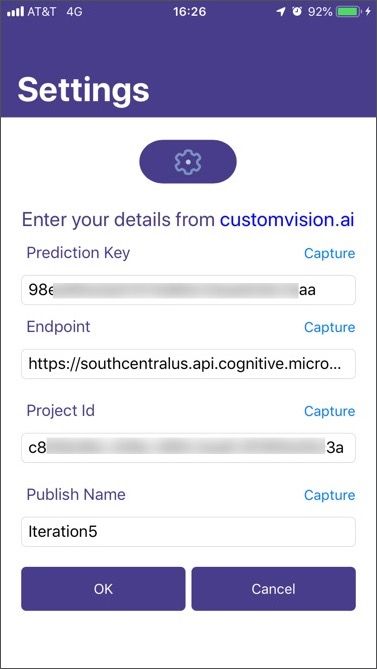
To use a model you need four pieces of information:
- Prediction Key - a unique API key for you to use to classify or detect objects
- Endpoint - these services can be run in different Azure regions, so you need the endpoint to show which region it is in
- Project Id - you can have multiple projects, and each one is identified by a GUID
- Publish name - each model has multiple iterations, and you publish the ones you want to be made available with a name
To use my model, I need to configure my app with all for of these pieces of information. I didn’t want to hard code them - I don’t want to have to rebuild my app every time I change project or iteration. Ideally I should be able to set these at runtime and store them between sessions.
I started off with a simple settings screen to type these 4 values in. I made a LOT of mistakes doing this as the values are long and complex. I needed to make my app more usable and find a way to avoid errors…
The solution was to use OCR - optical character recognition, using AI to convert text in an image to a string value.
Microsoft has a text recognition service available as part of the Azure Cognitive Services. This service takes an image, then detects text in it and returns that text.
Getting started
To get started you need either an Azure account. You can sign up for free here if you don’t already have an account.
You can access a free 7 day guest account without signup from here.
Once you are signed up, head to the Azure Portal to create a computer vision resource.
When you create this resource, you select what pricing tier you want - and there is a nice free tier allowing up to 20 requests per minute which is perfect for my app. Once created, you will need to grab the Endpoint from the Overview tab in the portal, and one of the keys from the Keys tab.
Using the service from code
There are a whole stack of SDKs available for Azure, covering the most popular languages and technologies, as well as a REST API for languages that SDKs are not available for. My app is a Xamarin app, so I used the .NET SDKs available on NuGet.
Install-Package Microsoft.Azure.CognitiveServices.Vision.ComputerVision -Version 5.0.0
Once the package was added, I just needed to take a picture and send it for processing. Taking pictures with a Xamarin app is not that complicated thanks to the Media Plugin, and I used this to take an image and give me a stream.
Once I had the image, I sent it to the Read API. This API takes an image and returns a token immediately whilst processing the image offline. You then call another API to check the status, and once the status comes back as processed you can grab the text.
Create the computer vision client
Before you can process an image, you need an instance of the ComputerVisionClient.
var creds = new ApiKeyServiceClientCredentials(<Your Key>);
var computerVision = new ComputerVisionClient(creds)
{
  Endpoint = <Your Endpoint>
};
In the code above, <Your Key> would be replaced with your API key for the computer vision service, and <Your Endpoint> would be replaced with the services endpoint.
Start the read request
To start using the Read API, you send the image to call to one of the BatchRead functions. There are several of these, depending on if you want to process a file or a stream. In my case I’m using a stream.
var results = await computerVision.BatchReadFileInStreamAsync(photo.GetStream());
var loc = results.OperationLocation;
var operationId = loc.Substring(loc.Length - 36);
The call to BatchReadFileInStreamAsync returns an intermediate result, and this has an OperationLocation - a token for the read operation. This is a long URL with the token on the end, so we need to extract the last 36 characters to get the token.
The result is an intermediate result, you will need to wait for the processing to finish
Wait for the request to finish
The request will take some time to run, as in a few milliseconds as opposed to minutes. The result of the batch call contains the status, and if this status is not complete then it can be retrieved continuously until it is complete, waiting between retries.
while (result.Status == TextOperationStatusCodes.Running ||
       result.Status == TextOperationStatusCodes.NotStarted)
{
  await Task.Delay(100);
  result = await computerVision.GetReadOperationResultAsync(operationId);
}
This code loops whilst the status is NotStarted or Running, pausing for 100ms then requesting the new status. Ideally you would also limit the retries and check for a Failed status.
Get the text
Once the status is Succeeded, the results will be available. The results come back as a list of TextRecognitionResult, each one referring to an area of text in the image. Each TextRecognitionResult contains one or more lines of text in the Lines property, and each line of text is accompanied by extra details such as the bounding box of the text. The lines are from top to bottom, so the topmost line of text would be the first entry in the Lines property, the next line down the next entry and so on.For my purposes, the settings page on the custom vision service has the data I need in a vertical list with the title of the field above the value, such as for the Project Id shown below.

In this case if I photographed these values and detected the text I would have one line containing the text "Project Id" with the next line being the GUID for the project Id.

I can now extract this value and use it in my app.
Done
Using the text recognition service from the Azure Cognitive Services means you will never have to ask your users to type in complicated data ever again!
You can find the code for my app on GitHub here: github.com/jimbobbennett/ObjectDetector. All the code that uses the cognitive services is in the SettingsViewModel.