All good IDE’s come with a framework for extending them, and Xamarin Studio is no different. It is built on top of MonoDevelop which makes extensive use of add-ins to provide a lot of it’s features, and it’s really easy to add your own.
Recently I created my own add-in to help out when building MvvmCross projects. If you wanted to do a ‘File -> New Solution’ in Xamarin Studio and create a simple, working MvvmCross cross platform app targeting iOS and Android you had to do a few things to make it work - you had to create the solution, ensure you have a PCL core project, an iOS app and an Android app, manually add the nuget packages for MvvmCross and either write the code yourself, or install the MvvmCross starter pack nuget package. This starter was helpful, it contained sample code and instructions showing what you needed to change in the code files that were already created in your apps. As great as this is though, I thought it might be better if you could do a ‘File -> New Solution’ and from the New Project dialog choose to create a fully working MvvmCross iOS and Android sample app to save a couple of minutes. #FirstWorldProblems.
Lets now walk through just how I did it and see how easy it was to create my add-in. I’ll be referring to my add-in in the examples, and you can find the code on my github.
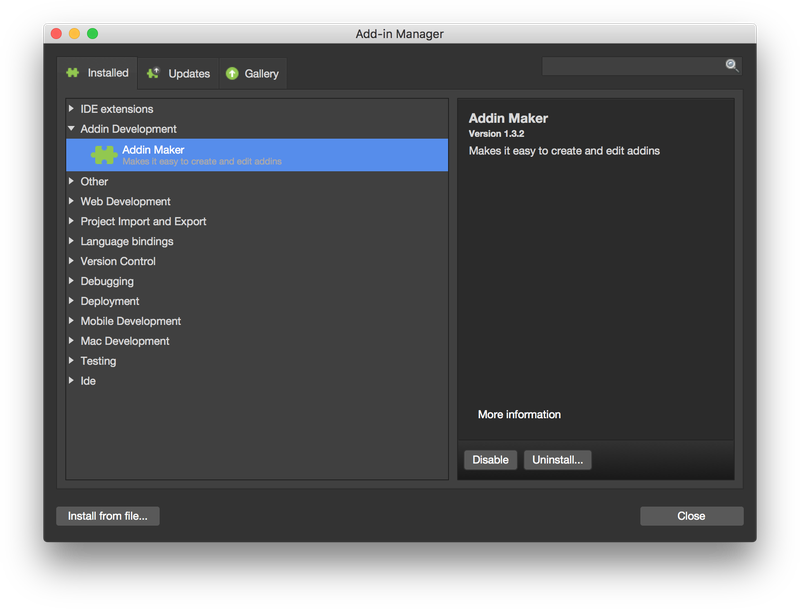
You can use Xamarin Studio to write add-ins, but first you need to install an add-in! Select ‘Xamarin Studio -> Add Ins…’ and add the ‘Add-in Maker’ add-in.
Once this is added I’d recommend restarting Xamarin Studio. If you don’t restart after adding add-ins they don’t always work correctly - new project types can be missing or in the wrong place.
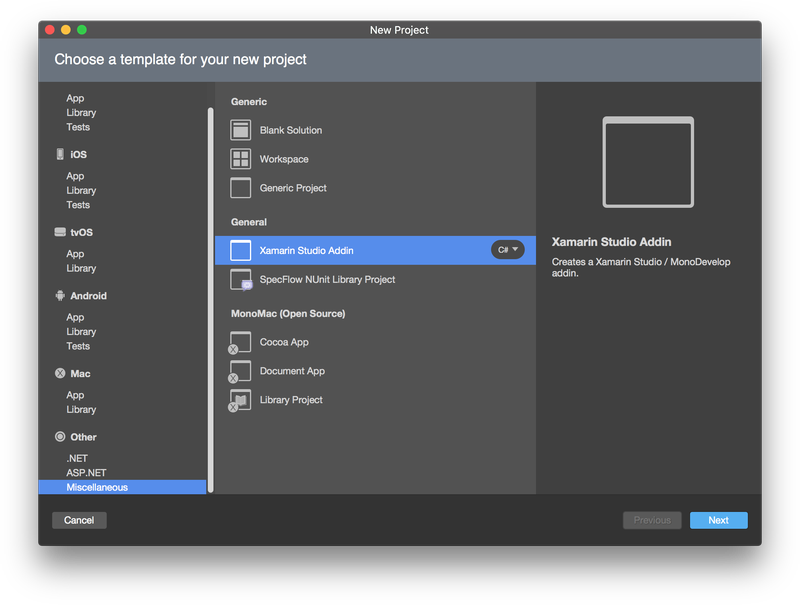
To create your add-in do ‘File -> New Solution’ and select ‘Xamarin Studio AddIn’ from the ‘Other -> Miscellaneous’ section.
When you create the add-in project you get a few things set up for you. Firstly you get a package reference to MonoDevelop.AddIns which is the NuGet package that provides a lot of the features you need. Secondly you get a couple of extra files in the Properties folder:
AddInInfo.cs- This file allows you to provide information about your add-in such as the name, category (so where it appears in the Add-In manager), description, author, version etc.Manifest.addin.xml- This manifest file defines what your add-in actually does. It lists any files or resources that are shipped inside the add-in, and defines what features are available.
My MvvmCross add-in provides a new solution type containing 3 projects. Adding a new solution type is actually pretty easy - you create an xml file that defines what projects go into the solution, with each project defined inside that xml file, and the files inside the project are provided by you as raw files that get copied in.
So if you look inside the Templates folder in the add-in project you will see 3 folders and an xml file. The MvvmCross.Solution.xpt.xml file is the one that defines the projects. If you open this file and browse the contents you will see the following sections:
TemplateConfiguration- This section defines the configuration for this solution template, such as it’s name, description, icon, programming language and where in the New Project dialog it should be.Combine- This section is the actual ‘instructions’ to to create the solution. This section has 3Projectnodes in it, and these represent the actual projects that will be created in the solution. In the project node we define the project name, type, directory that it lives in. In the sub-nodes we define the options that are set on the project, as well as contents of the project such as references and the files to include. These files that are included point to an actual file inside the project - and it’s this that makes it easy to create such an add-in. What you do is create all the files yourself, so create a project that matches the output of your add-in and add these files to your add-in project without a build action but copied to output. When your add-in runs it will build the project based on the instructions given, copying the files you’ve added to the new project.
One thing to note is the variables that are used such as ${ProjectName}. There are a few of these. and these are replaced with appropriate values when your add-in is run. For example ${ProjectName} is replaced with the name you put into the ‘Project Name’ in the ‘New Project’ dialog. As well as putting these inside the xml file you also need to use these in the source files that are shipped with the add-in. You also have to be aware that these variables can change based on the scope - so for example is you created a new solution using the add-in called ‘Foo’, when building the solution ${ProjectName} would be ‘Foo’, but if the solution creates a project call ‘Foo.Core’, inside any code files for that project ${ProjectName} would actually be ‘Foo.Core’, and to get ‘Foo’ you have to use ${SolutionName}.
Have a look at the code in the MvvmCross add-in and you’ll see this in action. It’s actually pretty self-explanatory once you start reading a real example, which is one of the great things about the Xamarin Studio add-ins.
Once you have built your add-in, you can run it and it will launch a new instance of Xamarin Studio with your add-in installed for you to test out. If you want to ship the add-in to other people to try out you need to package it using mdtool, which is buried inside the Xamarin Studio application package:
/Applications/Xamarin\ Studio.app/Contents/MacOS/mdtool setup pack SomeAddin.dll
This will spit out an mpack file - a mono package that contains the add-in. You can send this file out and users can add it from the ‘AddIn Manager’ using the ‘Install from file…’ option.
The last file to note is `addin-project.xml’. You need to create one of these if you are want to ship the add-in to the gallery at http://addins.monodevelop.com. When you ship an add-in it will grab code from your repo and compile it up, and this xml file is used to tell their compiler what to do.
Easy, and awesome!
Now go off and write an add-in, and ping me here or on twitter if you have any questions.
This blog post would be complete without a shoutout to Mikayla Hutchinson and Lluis Sanchez Gual from Xamarin for being awesome and helping me get my add-in working and up on the add-ins gallery. You rock!