I’ve recently been looking at the authentication offered by Azure for use in a mobile app, specifically using social auth providers like Facebook to allow a user to sign up for my app. The auth setup is incredibly easy, with Azure taking care of a lot of the hard stuff. There are also loads of great docs on how to get it set up - including the Microsoft docs available here - https://docs.microsoft.com/en-us/azure/app-service-mobile/app-service-mobile-xamarin-forms-get-started-users.
The whole login flow is very well documented, so I won’t repeat what’s in the previous link. Just follow the instructions in that link and you can use your Xamarin app to authenticate with Facebook and get back a logged in user.
What does seem to be missing from the docs though, is what happens next. When you log in using the MobileServiceClient.LoginAsync method you get back an access token, and that’s it. So what is this access token, and how can it be used to access the users personal information, such as Facebook photo or friends? That’s what we are going to look at in this post.
When you make a call to LoginAsync, the SDK opens a web view pointing to your app service, which in turn redirects to the Facebook login. When you log in, the web view redirects to your app service, which redirects back to your app. Along the way, the Azure app service picks up an access token from Facebook, which it keeps hold of, and returns you an access token from Azure.
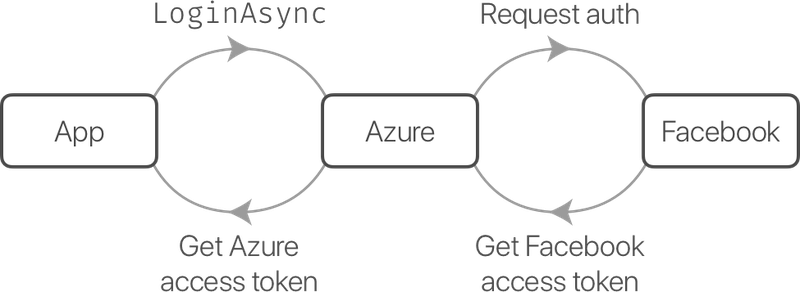
Your app doesn’t get the Facebook access token, just an Azure one. Instead your app service keeps hold of the Facebook access token. This I imagine is intentional - your app can authenticate with multiple providers at the same time, for example linking to both a Facebook and Twitter account. Instead of returning access tokens to your mobile app for all of these providers, it returns just one, and this can be used to extract all the information you require via an auth service built into the Azure app service.
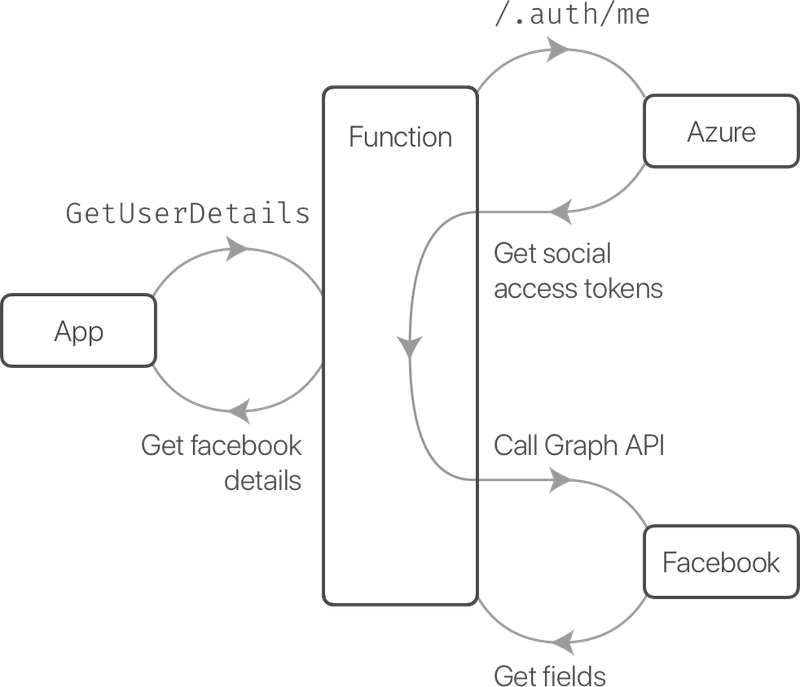
This auth service is available from the https://<my azure website>/.auth/me end point on your app service, passing the access token as a X-ZUMO-AUTH header. This returns a JSON document containing information from all social auth providers that the user has signed in with, including the access tokens, as well as some basic personal information such as first and last name. The Facebook access token that comes back can then be used with the Facebook Graph API to download whatever details we’ve granted to the app, such as our profile pic or friends list.
From my mobile app I want to download the users Facebook profile, but I don’t want to make multiple server calls to do it. From my app I could call the /.auth/me endpoint, get the access token, then make another call to the Facebook graph, but it might be better to do it in one call, handling all the steps server side (including the logic around which social provider to use if more than one was provided). By doing this server side I can also cache information in my app service, maybe for later processing. The easiest way to do this is via an Azure Function.

If you’ve been living under a rock for the past few years you may have missed out on the rise of serverless, but I imagine most of you are familiar with the concept. Azure functions are simple functions that are run in response to a trigger, such as a web request, a timer or a message on a queue. These run on someone else’s hardware (hence the same serverless - you don’t have to provision a server to run them on, someone else does it for you), and you only pay for the CPU/RAM usage, not a monthly cost for hardware. This means they are cheap - potentially millions of calls for less than a cup of coffee. They are also infinitely scalable, if your function gets hit a bazillion times it will scale up automatically. If you want to learn more, check out this Channel9 video from Jeremy Likness, a Cloud Developer Advocate at Microsoft.
We can use a simple function to do all our server side processing for us. Log into the Azure portal and create a new Function App. Fill in all the normal details, making the name something simple to remember such as <my app service name>_functions. The hosting plan is a new option, specific to functions. You can choose to link it to an existing app service so that it will only use those resources (and not end up costing any more than the app service rate), or a consumption plan where you pay per usage - with a very generous free tier including being able to run a million function calls before you start paying.

Fill in all the details and click Create. Wait a couple of minutes for your function to be created then head to it. Select the functions node in the tree under your functions app, then select + New Function. From here you can choose from a set of function templates with different triggers and languages. We want a function that uses an Http trigger so that we can call it from our mobile app, and I’m using C# but you can use F# or Javascript if you prefer. Select HttpTrigger - C#, give your function a name such as GetUserDetails, set the authorization level to anonymous (I’ll look at security more in a later blog post), then click Create.
When created you will see your new function, which is essentially a C# script file that you can edit in your browser, with one method in it - public static async Task<HttpResponseMessage> Run(HttpRequestMessage req, TraceWriter log). This method is passed the Http request used to make the call to your function, and returns an Http response with all the usual response stuff, like status code and any content. The function has a sample implementation that looks for a name field in a JSON body and returns a hello message to that name - the canonical Azure functions ‘Hello World’. If you click the Run button, a pane will slide out from the right with a ‘Test’ tab that can be used to test the function. You’ll see the response from the call in the ‘Output’ box, so run this function to see it in action, changing the name in the request body to see how it all works. The browser experience is limited though, so you can’t debug your functions, just run them (but you can write to the log parameter to see output in the log box on the bottom).
The first thing our function needs to do is to call the auth endpoint to download the user details including access tokens for our social providers. To do this, it needs the access token from our mobile app, so we’ll assume this will be passed as an Http header called ACCESS_TOKEN. Delete the code inside the function, and start by adding the line below to read the access token from the headers:
var accessToken = req.Headers.GetValues("ACCESS_TOKEN").FirstOrDefault();
Now we have the token, we need to pass it to our auth end point using the standard C# HttpClient. Add the code below, changing <my site> to the address of your Azure app service (this is your app service used for authentication, NOT your Azure function service):
var client = new HttpClient();
client.DefaultRequestHeaders.Add("X-ZUMO-AUTH", accessToken);
var meResponse = await client.GetAsync("https://<my site>/.auth/me");
var content = await meResponse.Content.ReadAsStringAsync();
This code creates a new HttpClient, adds a X-ZUMO-AUTH header using the access token from the headers, and downloads the content. To see this in action, run your Xamarin mobile app through a debugger, log in using facebook, then copy the value of the MobileServiceAuthenticationToken property on the MobileServiceUser returned by the call to LoginAsync. From the Azure function, go to the test tab, set the Http method to ‘Get’, and add a new ACCESS_TOKEN header with the value set to the MobileServiceAuthenticationToken property. Finally add some code to the end of the function to return the auth response:
var response = req.CreateResponse(HttpStatusCode.OK);
response.Content = new StringContent(content, System.Text.Encoding.UTF8, "application/json");
return response;
If you now run your function, you will see the response from the auth endpoint in the output window as JSON. If you tidy this up, such as using the Prettify JSON extension in VS Code you will see it is an array of objects that contain information for each social auth provider the user is authenticated against, with fields such as the provider_name, a list of user_claims, which is assorted data about the user relevant to the provider, such as name, gender and location. It also contains a field called access_token, which is the provider specific access token that we can use to access the Facebook graph API.
We can get this field from the JSON using our old friend Json.Net. Azure functions have a few NuGet packages that are always available, and one of these is Json.Net. To use it we have to start by referencing the assembly, then add a using directive to the top of the function:
# r "Newtonsoft.Json"
using Newtonsoft.Json.Linq;
We can then use it to parse out the Facebook access token:
var fbAccessToken = JArray.Parse(content)[0]["access_token"].ToString();
If you want to test this out, change the content of the response to show the fbAccessToken instead of content and run the function. You’ll then see a nice long access token string in the output.
Once we have this access token it can be used to query the Facebook Graph API. You can read the docs on the Graph API here and try it out using their Graph API explorer.
Essentially it is an API that you make GET requests to, passing a query string defining the fields you are interested in, and using the access token for bearer authorization. Create a new HttpClient and set the bearer authorization using the Authorization header and a value of Bearer <facebook_access_token> as shown below:
var graphClient = new HttpClient();
graphClient.DefaultRequestHeaders.Add("Authorization", $"Bearer {fbAccessToken}");
Then we can make a call to the Graph API, in this case loading the users first name, last name and profile picture. The fields we want are passed to the graph API call as a comma-separate list passed as a query parameter:
var graphResponse = await graphClient.GetAsync("https://graph.facebook.com/v2.11/me?fields=first_name,last_name,picture");
var graphContent = await graphResponse.Content.ReadAsStringAsync();
Finally change the response to return the graph content:
response.Content = new StringContent(graphContent, System.Text.Encoding.UTF8, "application/json");
Now if you run this, you will see the output from the Facebook Graph API, providing the URL of the users picture, their first name, last name and unique Facebook Id. A sanitized version is shown below:
{
    "picture": {
        "data": {
            "height": 50,
            "is_silhouette": false,
            "url": "<url of my facebook profile pic>",
            "width": 50
        }
    },
    "first_name": "Jim",
    "last_name": "Bennett",
    "id": "<my id>"
}
The basic flow is:
Now we have our function, we can call this from our Xamarin mobile app as soon as the user is logged in. Once we have the user object, we can call our Azure function as if it was any other REST API using the code below:
var client = new HttpClient();
client.DefaultRequestHeaders.Add("ACCESS_TOKEN", user.MobileServiceAuthenticationToken);
var response = await client.GetAsync("https://<my function app>/api/GetUserDetails");
var content = await response.Content.ReadAsStringAsync();
We pass the MobileServiceAuthenticationToken property from the user object as an Http header - this is the access token from our Azure app service. We then call the new function which is at https://<my function app>/api/GetUserDetails. The URL of your function app is <the name you gave it>.azurewebsites.net, unless you have decided to use a custom domain, and you can find this value by clicking on your function app in the tree in the Azure portal and looking at the details on the right.
The content that comes back is the JSON from Facebook, and you can convert this into useful data by building a simple class to represent the data and deserializing the JSON into it using Json.Net. The classes to use to deserialize are:
public class FacebookPictureData
{
    public string Url { get; set; }
}
public class FacebookPicture
{
    public FacebookPictureData Data { get; set; }
}
public class FacebookDetails
{
    [JsonProperty("first_name")]
    public string FirstName { get; set; }
    [JsonProperty("last_name")]
    public string LastName { get; set; }
    public FacebookPicture Picture { get; set; }
}
You can then deserialize the content from the function call using:
var facebookData = JsonConvert.DeserializeObject<FacebookDetails>(content);
Done - you now have the users first name, last name and a URL of their public Facebook picture that you can use as an image source for a Xamarin.Forms Image control. If you want more data from Facebook just add more fields to the Graph API call an the details class on your mobile app.